The Fashion Sewing Group It's about the clothes.
These
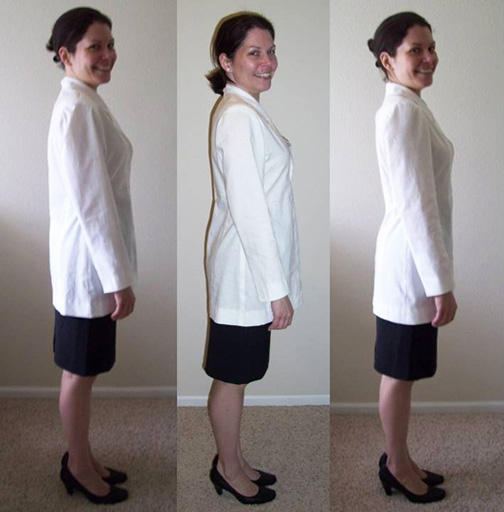
images are for the July - August 2011 newsletter.

The muslin is cut from size 8 pattern. The only adjustment I made was to shorten all the pieces 1" above the waist. What do you think?
-Alexandra
July - August 2011
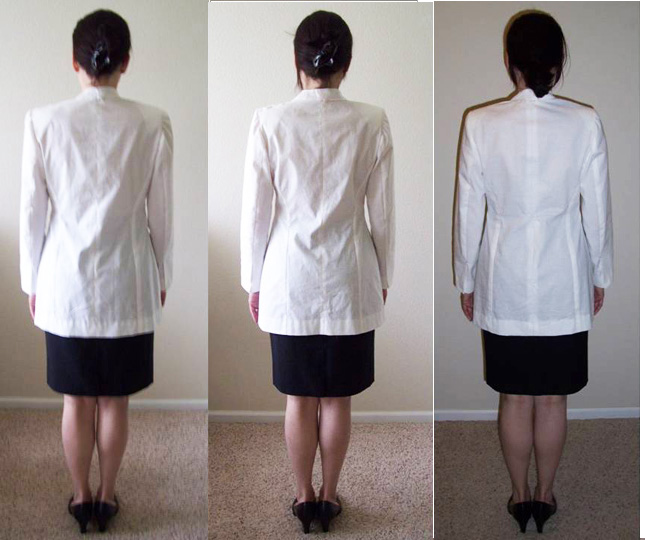
First in the back, it seems as though you could take in/taper in the CB seam a little, particularly as it approaches the waist--I also think that your skirt waist is probably a little lower than the waist of the jacket that appears a little high. Did you really need to fold out a full 1"? Doesn't the waist indent at its narrowest point seem a little high to you? I think it's close, but it's more pronounced in the front than the back.
Now having said that, if you take in the CB seam it won't help with the shoulder line. It's too long. You'll need to remove about a seam allowance at the top of the armscye tapering to nothing at the notches. You know the drill.... That will help the collapsing you described in the front. Also, in a muslin, you get some of that since there's no support where support will be i.e. facings with interfacing. So I'd first shorten the shoulder line to bring that more on your shoulder than the top of your arm. Then see about the waistline placement and tapering the CB seam. The next thing I'd double check would be the slight drag lines from bust point to underarm in some of the side pix, but again that could be the muslin sticking to your clothing and the low shoulder creating that, or if the jacket needs to be let out slightly at the side seams or the front/middle front panel for a bit more bust room. Start shoulders and armscye, then waist/CB seam and then address the girth at bust and hip. Very good start though I'd say and your older jacket looks just like you described--pretty wearable but you know it could be better. Hey, that just makes it look like ready-to-wear;-)
-Nancy
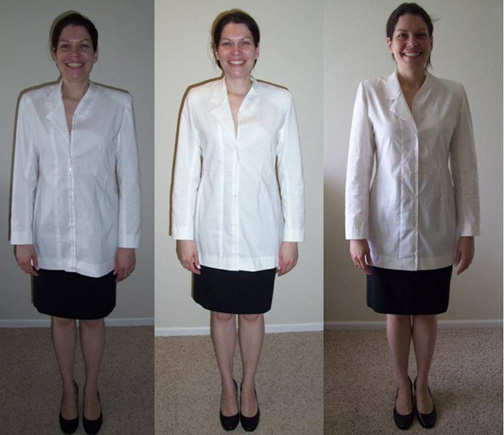
I have attached side-by-side comparison pictures of me wearing the muslin with and without shoulder pads. Without them, the neckline sits where it's supposed to be instead of standing away from my neck (sitting in the air) as it does with shoulder pads. It didn't seem to do anything about the wrinkles though.
Waist:
the 1" came from measuring the older jacket from the neck to the
pin. I did it like so: after putting on the jacket and buttoning it, I
cinched it using the tape measure instead of a belt and stuck a pin in
the middle of it. Then I took it off and measured. My actual CB measurement
(body) is 13.5" so the 14" didn't seem surprising. When I put
on the muslin without the shoulder pads and cinched it with the tape measure,
it was right on according to my MIL. The shoulder pads do pull it a little
bit higher. In the front, it looks like I need an FBA to help the waistline
fall into place no matter what.
I marked the alteration by measuring from the hem to the waistline mark
on the pattern, and then 1" higher. I drew lines perpendicular to
the grainline on all the pieces and brought them together, blending the
cutting lines.
I can definitely twist in the jacket, there's plenty of room. In the pictures with shoulder pads, I'm wearing a full slip tucked into the skirt to keep the muslin from sticking in the upper body area. In the pictures without shoulder pads, I'm wearing only a bra. I didn't want to wear anything that would help the muslin show phantom wrinkles. I usually wear sleeveless sheath dresses or skirts with a fine gauge sweater so it's not like we have to account for any major thickness in these preliminary stages.
I'm going to start
marking the alterations you mentioned and then take pictures.
-Alexandra
Hi Nancy,
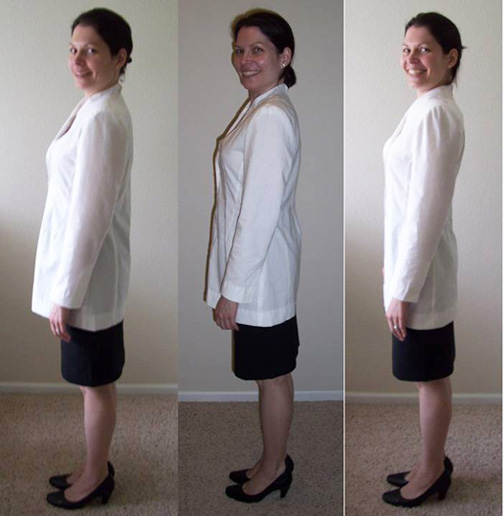
OK, I narrowed the shoulders 1/2" at the shoulder point, tapering to nothing. They look much better now. It also looks like the CF dropped a little bit, not quite into place but better than before (how? I don't understand why narrowing the shoulders had an effect on this). I am now getting a wrinkle at the back neck and the neckline is still standing away from my neck. Please see pictures.
I also took in 3/8" at CB waist, for a total of 3/4", which helped some but I need to do some more. I'm thinking I should take in a little bit at the other two back seams and maybe even the side seams, rather than take out more at CB, to make it more even. Am I on the right track here?
Thank you,
-Alexandra
The shoulders are much better--part of that "fix" is because the armscye holds the fabric wider, so putting the sleeve up higher allows the jacket to hang from your shoulders rather than the tops of your arms holding it outward...in one of the pix you can see the line from the armscye diagonally downward across the chest. Are you using my shoulder pads since I'm not seeing the cap of it shadowed across the top of the sleeves? Those should not lift the jacket at the neck edge since they're nearly flat at that end, so what I'm seeing is that the 1945A side isn't buttoned closed/overlapped at CF which is why it's standing away on that side. Once you get it buttoned, I think you'll be fine since this has never (and I really mean never) been an issue at any time on anyone. The upper edge of the A side falls really in a straight line under your chin--CF should be there...it should probably be a little farther over in reality and will nest just right then.
Sideways it seems to pull up in the front, particularly on the A side...maybe cut that out at the 10 across the bust...there are actually two ways to alter the A bust, one slashing from the shoulder then through the double pointed end dart to the hem, and spreading the pieces. OR, you can add a bit to the front edges of the front and facing, or you could just cut out the size 10 at the bust areas, not the neck, shoulder, or armscye. If you have my jackets workbook, you can see the diagrams and directions for this on page 17-19.
At the bottom of 19 it talks about when the front pulls up--when you have fabric crossing over a mound (;-), it takes up length, so I'd add some length to the front, truing it up at the side seams. Maybe your MIL could measure the distance from the floor to the CF and then at the side seam and you'll know how much to add, or just add an 1 1/2" or so and when you hem it, you can make sure your hem is parallel to the floor.
Other than that, I think you can shape the back when you're under construction.
Nancy
Thank you for explaining the shoulder width fix. I don't think these are your shoulder pads, they're just a pair that I miraculously found in one of the moving boxes (when I was looking for something else, but I grabbed them anyway). I think I'll have to order some of your shoulder pads soon.
I have attached
pictures of the newest version. While not perfect, they do look much better.
I added the 1" back to CF, blending to nothing at the side (to meet
the shortened back pieces). I ended up with a mini bust dart on the 1945A
side. (Please forgive me for screwing with your brain child.) In a nice
woolen, it will just ease to the other side of the long dart but in cotton
muslin, there was no way to get around it.
I see some wrinkles on the back between my shoulder blades and the armscye.
It seems as though I could smooth out the fabric from CB toward armholes,
and then take out that extra little bit. It also looks like maybe I could
take out just a tiny bit more at the CB waist, tapering up and down. What
do you think?
This is what I have done to the pattern so far:
1) shorten back pieces 1" above waist;
2) FBA for length only - essentially leaving original CF length, then
making fronts 1" shorter (above waist) toward the side seam so it
fits with the side back piece;
3) shorten shoulder seam 5/8", blending to just below notches;
4) raise armhole 1/4" (let out shoulder seam 1/4" at shoulder
point, raise side seam 1/4", blend);
6) take in back seams 3/8" at the waist all the way down to the hem, tapering to nothing 2" below the armhole "point" on the pattern piece.
7) spread outer edge of 1945 collar 1/4" (two slashes 1/8" each). It had been settling about a 1/4" away from CB on the first muslin.
I seem to have plenty of room in the jacket as far as circumference goes. It fits very comfortably. And it looks pretty (if I say so myself) even in muslin. I'm ready to become another walking FSG advertisement.
-Alexandra
I'm laughing or maybe chuckling out loud is the best description--you're smiling like a cheshire cat with these new tweaks and I can understand why--it is EXCELLENT! My chuckling is more about the pride a mother has in her children's accomplishments.
Never worry about messing with it, adding a dart or anything else that makes it work for YOU. It's great that you know what to do and did it. I'm only terrorized about a jacket that might be made in orange with pink polka dots or some weird execution.
Keep smiling--it's brilliant and you're terrific. I've never seen a muslin look as nice as yours.
-Nancy
Hi Nancy,
I'm glad you got a chuckle out of my facial expression. (I also have some hall of shame pictures that I wouldn't dream of letting anyone see.)
Orange with pink polka dots is definitely not my style. If I saw somebody dressed that way, I would try really hard to wake up from the nightmare.
I pinned in a few tiny tweaks on that muslin. I also see boobie starbursts indicating a need for a small FBA. (When I narrowed the back, I took away the fabric that the bust was borrowing.) Last night I fixed the pattern and I am hoping to get one more muslin done today or tomorrow. After that, small changes can be worked out in regular fabric during fitting, I would think.
Thank you very much for your help!
-Alexandra
I think even the small changes you're talking about can be fixed in the fabric. I wouldn't bother tweaking the muslin further since fabric is such a huge game-changer. Don't work too hard--there's no major payoff at this stage unless you have to get a grade on your muslin or wear it to the wedding on Friday....
-Nancy

Hi Nancy,
I did make one last muslin. A little obsessive, I realize that. Anyway, here are the pictures of it - the sleeves now fit into the scooped out armholes beautifully (I didn't make any alterations to the sleeve at all) and the back has more curve. Next stop - a wearable jacket in a nice suiting. I am really excited to get started.
Again, thank you very much for your helpful suggestions and generous praise.
-Alexandra
©2007 Erickson Consulting
Group. All Rights Reserved.
www.fashionsewing.com
This site is best viewed using the browser Internet Explorer Version 7.0 or
later.